

6 Tips for an Amazing Workflow With Windows Terminal and WSL2
Do you want a windows terminal like the one in the cover without spending hours or even days going through tutorials, docs, and trying to find that secret phrase to search on google to get useful results?
Scroll down and you can learn how. But if you just want the settings then go to the bottom and you will find 2 gists waiting for you.
The new Windows Terminal 💻
I was sketchy about the new Windows Terminal being good, but after using it for a couple of weeks I have to say that it is not bad. There are a few things that are nice as well as annoying about it which I’ll talk about in the end but the good thing is that it is open-source. This means if you want a feature click here, clone the repo, and build it 🤓! But it’s not that easy for newbies like me so we just raise issues and hope that some legend solves it 🙈
Until then download it from the store and scroll down to customize it.
Install WSL2 🏃🏽♂️
I’ve always dreaded windows and ridiculed friends who use it to code, but with WSL2 I’m not so sure I can continue doing that. However, if you’re using WSL1 I urge you to get WSL2 because of these reasons but do not if you need these features.
If you’re not convinced to try it out, here are a few reasons to persuade you:
Now that you’re hopefully convinced, follow the instructions in the official guide and install it. Beware for it involves a few restarts and errors👹 but the guide shows how to fix them as well.
Tip 1: Set a WSL distro as the default profile 🐧
In the Windows terminal, a profile simply put is a template shell session where you can have an executable such as PowerShell or a WSL distro load up with a specific starting directory to avoid 💿ing to a directory you use a lot, have it’s own color scheme, background image, etc.
I don’t think I will ever use Powershell unless I need to install something for Windows. So naturally, I wanted Ubuntu(the WSL distro I use) as my default profile because I am a normal person and I can’t press Ctrl+Shift+4 and be like "That felt good 😏" so yeah this was the first thing I did.
Customizing the windows terminal is easy because it’s just a JSON file 🤗
Step 1: Open the settings of the Windows Terminal
You can press Ctrl + , or click the down arrow in the top bar and choose the settings option.

Step 2: Find the guid of the profile you want
In the profiles object, there will be a key called list which is the list of profiles. Find the profile you want as default and you will notice a guid key in it.
{
    "guid": "{2c4de342-38b7-51cf-b940-2309a097f518}",
    "name": "Ubuntu",
    "source": "Windows.Terminal.Wsl",
    "startingDirectory": "//wsl$/Ubuntu/home/bharath"
}
Step 3: Replace the default profile guid with the one you chose
Copy the guid of a profile you want as default and paste it in the value of the defaultProfile key.
{
    "$schema": "https://aka.ms/terminal-profiles-schema",
    "defaultProfile": "{2c4de342-38b7-51cf-b940-2309a097f518}",
}
Step 4: Save, close, open and magic
Save the settings.json file. Close the windows terminal and open it again. You should have the profile you chose to show up by default. If you want it to be at the top of the menu, you can always reorder the objects in the profile list.
Tip 2: Have multiple profiles for the same distro 🤹🏽♂️
If you’re using your machine for work, learning, projects, etc having separate profiles might help you.
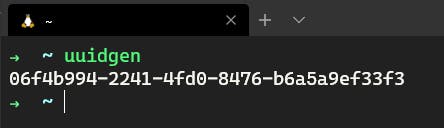
Step 1: Generate a GUID or UUID
If you’re using a Linux distro, you can use the pre-installed uuidgen command.
If you’re using Powershell, then use the command below with the quotes.
'{'+[guid]::NewGuid().ToString()+'}'

Step 2: Find the right command-line tool and arguments
If you’re trying to make a new WSL profile then you can’t use the source key with the value as Windows.Terminal.Wsl. What you can do is use the wsl command-line tool to launch any distro you want.
I used the command wsl -d Ubuntu because I installed Ubuntu, but you can replace that with a distro of your choice. Then choose a starting directory for this profile if you want. Since we’re using the command line as the way to launch our profile, we’ll have to provide a path to a custom icon. I used icons8 for this, feel free to use any source of your choice. Once you’re done your profile should look like this.
{
    "guid": "{10159356-1e07-459e-b7b2-7fa5e62984dd}",
    "name": "Ubuntu - Projects",
    "commandline": "wsl -d Ubuntu",
    "startingDirectory": "//wsl$/Ubuntu/home/bharath/projects",
    "icon": "C:\\Users\\Bharath\\Documents\\wt-profile-res\\icons8-project-48.png"
},
Tip 3: Color scheme 🎨
I don’t need to tell you why you need a color scheme for your terminal, editor, IDE, etc. Adding a color scheme is as easy as adding an object to the schemes array. To find themes like this I used this tool made by Tom. It gives you the color scheme object. Here’s how it looks like.
"schemes": [
    {
        "name": "DraculaPlus",
        "black": "#21222C",
        "red": "#FF5555",
        "green": "#50FA7B",
        "yellow": "#ffcb6b",
        "blue": "#82aaff",
        "purple": "#c792ea",
        "cyan": "#8BE9FD",
        "white": "#F8F8F2",
        "brightBlack": "#545454",
        "brightRed": "#FF6E6E",
        "brightGreen": "#69FF94",
        "brightYellow": "#ffcb6b",
        "brightBlue": "#D6ACFF",
        "brightPurple": "#FF92DF",
        "brightCyan": "#A4FFFF",
        "brightWhite": "#F8F8F2",
        "background": "#212121",
        "foreground": "#F8F8F2"
    }
],
I used the Dracula Plus theme because it has the goodness of Dracula and the simplicity of One Dark.
After that to use the color scheme you can use the colorScheme key and either set it in the defaults object in profiles or you can have different palettes for different profiles. You can find more settings for how your terminal looks in the Profile Settings docs.
Tip 4: Panes 🚪
If you’ve used tmux or terminator or something similar then you’ll know how cool and useful panes are. However, if you’re new then have another look at the pic on the top. Those small shells are called panes.
The official docs do a great job of demonstrating how to use them so I’m gonna talk about its only drawback.
The Windows terminal does have panes but it’s not normal. It’s a bit weird. When you open a new pane, it does not use the starting directory of the previous pane. Now, you might be like

But fear not, for I have a solution, well more of a workaround.
So, in my quest to search for a sane method to use panes I came across the docs for the command-line arguments of Windows Terminal. They have arguments for splitting panes, opening new tabs with a profile, starting directory, tab title, etc.
Then it hit me, Linux has this amazing thing called aliases to execute command-line tools with arguments. So, I made a function called coolpanes to accept 2 arguments, the profile name and the starting directory for the panes. Here’s an example:
function coolpanes() {
  cmd.exe /c "wt.exe" -p $1 -d $2 \; split-pane -p $1 -d $2 \; split-pane -H -p $1 -d $2 &
}

alias lbla="coolpanes \"Ubuntu - Projects\" //wsl$/Ubuntu/home/bharath/projects/bla"
You can make functions like coolpanes to suit your pane structure, and then use them to make aliases like lbla for each combination of profile and directory of your choice! The reason I called this a workaround is that it always opens it in a new window and sometimes the background process doesn't return but you can always exit the previous window safely so 🤷🏽♂️.
But wait, there’s more! Programmers don’t like repetition so making an alias every time you need it is boring. This is why I came up with this new function and alias that uses coolpanes called cwdpanes which stands for the current working directory panes. Then I made an alias just to specify the profile.
function cwdpanes() {
  cwd="//wsl$/Ubuntu$(pwd)"
  coolpanes "$1" $cwd
}

alias wtcwd="cwdpanes \"Ubuntu - Home\""
Fun fact: I was stuck at this for a while because I forgot to prepend //wsl$/Ubuntu to the pwd result 🤦🏽♂️. Typical bug life.
Here’s a short gif that demonstrates both lbla and wtcwd.

If you don’t know how to make aliases of your own, this is a good article to help you get started.
Tip 5: Use the Linux file system 📁
Any file that you want to use inside WSL, make sure it lives in the Linux file system and not the Windows file system if you want fast or even normal speeds. I didn’t notice this until I used VS-Code with the Remote WSL extension for a project which was stored in the Windows file system. Any change I made in the terminal was not reflected unless I manually refreshed the file tree. This is when I read Microsoft’s tip that says
Use the Linux file system for faster performance
We usually download packages from browsers that get downloaded to the Windows file system. So having an environment variable to the root directory of the windows filesystem can come handy to transfer files between Linux and Windows. This is mine
export win10="/mnt/c/Users/Bharath"
Here’s a simple demonstration of transferring the Debian package of Github’s new command-line tool called gh from the Windows file system over to Linux.
Tip 6: Snaps 🐦 and systemd 👿
If you’ve been using snaps and tools that need systemd then you should know that systemd is not supported in WSL by default for any distro.
Here are 2 ways you can get it:
The first script is only made for Ubuntu distros and the second tool is made for Debian based distros and Arch out of the box but you can build it from source for any other Linux distro.
WARNING: I am not responsible if these tools break your machine!
So be responsible and back up your files. Make a new fake account and test it there. If you are convinced, only then use it in your main machine.
Bonus Tip 7: Do not right-click 🖱
I don’t know why but apparently, it’s a "feature" to paste the clipboard’s content if you right-click in the terminal. So, if you don’t like this then don’t because there is no setting to disable it as of now. Hopefully, it’ll come in a future update.
TL;DR
These are the gists of my zshrc and the settings.json of the Windows Terminal. I also disabled the default setting that copies selected text to the clipboard automatically because I usually do that just to scan through long error messages.
Summary
If you’re wondering how to get your shell prompt to look like mine, that’s because I use zsh and oh-my-zsh. I didn’t mention this as a tip because it’s a preference of mine.
The above tips are what I found and made to make my life easier. If you have more then please leave them down in the comments because you never know to whom it might be helpful(I mean me 😁). You can find more global settings, key bindings, and other info here. BTW this video by Fireship is what gave me hope to use Windows for development, so check it out if you’re unsure.
Huge shout out to my friend Mayank Shah for his help and insights on the Linux file system and systemd tip 🙏🏽🙏🏽
Hope this helped you out! Thank you for reading and scrolling!